Thursday, December 18, 2014

A Cinderella Story, Middle Aged Version

Every December we attend a charity ball benefiting a local hospital.  Yes, every December.  I know that it is always on the calendar, yet I am never happy with what I have to wear.  Every year, I tell myself that I'm going to sew a gorgeous, flattering dress for next year.  But I get busy with other things and next thing you know, December is here and I'm pulling out my old standby: black taffeta skirt with one of three coordinating tops.
This top has seen more than a few too many charity balls. I think this one
was 2008, the first of many appearances.
One year, the lady sitting next to me wore the same thing.  We had a good laugh, knowing that it was more than a few years old. After that, I vowed not to wear the black taffeta top again.  Last year, I wanted to make myself a nice lace blouse to coordinate with the black taffeta skirt, but something else got in the way and I ended up with a velvet blazer and tank from Dillard's purchased a day or two before the event.  It was very warm and comfortable, but not at all elegant, a little too big and not that flattering.  We have a hideous family picture with me wearing it.  The kids make jokes about it almost weekly.
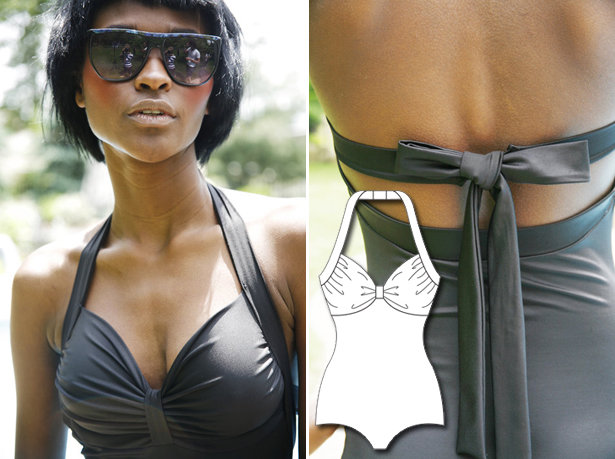
View C would be perfect!

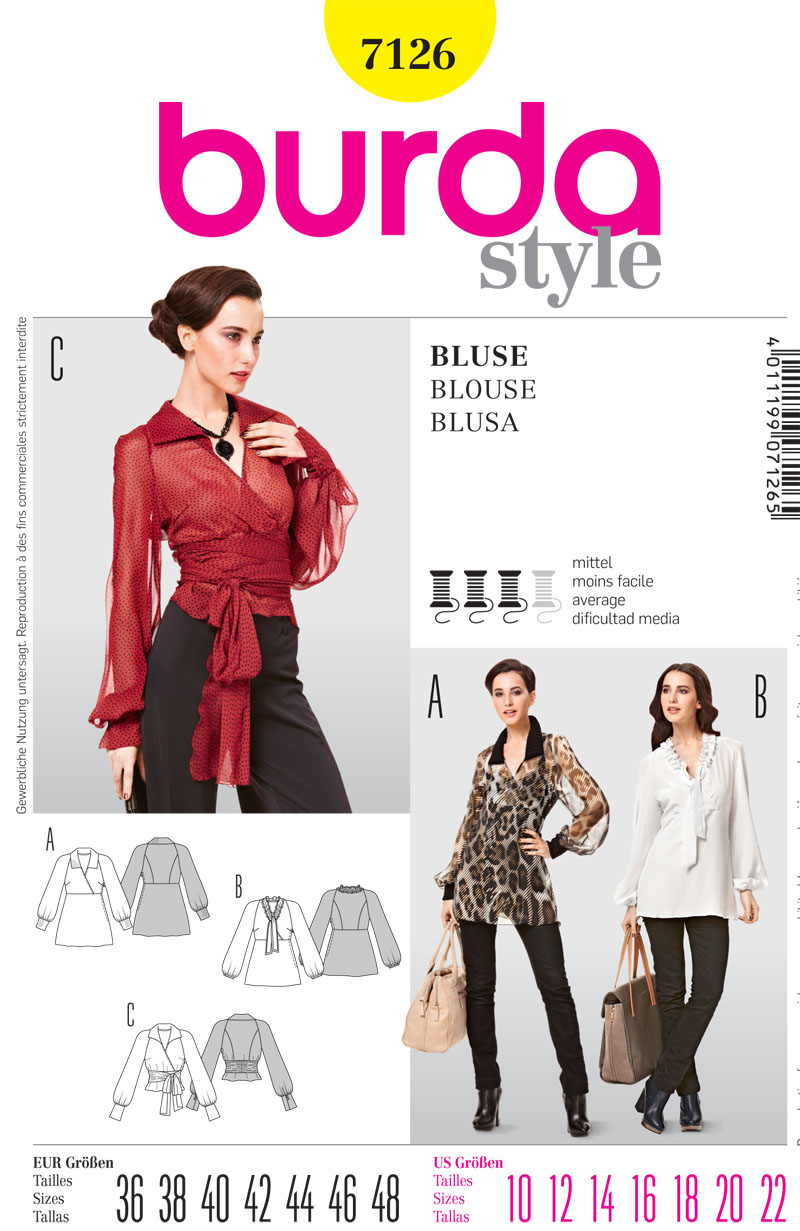
This year was going to be different!  Even though I am (still) remodeling a bathroom, I was sure I could make time to sew a simple, but elegant blouse to top the taffeta skirt. Burda 7126, which would look lovely with lace or organza, would be perfect.  I even bought some fabric, and interfacing and glass buttons -- everything I'd need.  Then a last-minute business trip popped up on my schedule in the first week of December.

So once again, I found myself at Dillard's the day of the event.  The special occasion area was bustling.  It was truly disappointing to see the racks of identical gowns, that were not my style, and many were poor quality.  The taffeta skirt is a basic, so I just focused on finding a new top to dress it up.
I saw three women wearing this exact dress at the event.

There was a lovely white lace blouse, but the only one in my size had lipstick smeared across the front from another shopper.  It looked better on the hanger than it did on me and it itched.  I even saw a few of the same tops I tried on last year.  At full price.  Really?  Don't they mark down old merchandise?  I found myself feeling quite superior to the inventory.  Why didn't I plan to make something?  It would have been so much better!

After trying on a few tops and wondering if I could remove the lipstick stain from the white lace, I finally settled for a black lace Calvin Klein jacket that I thought I'd be able to wear over my velvet tank from last year.  At the end of my wait at the cash register, the harried sales clerk looked down her nose at me while "informing" me that there was a very important gala this evening that was keeping her busy.  I smiled kindly, "Yes, I know.  I am shopping for that myself."  She acted like she didn't believe me and didn't say another word to me while checking me out.  What?!  I nearly walked away, but bought it anyway and went home dejected.

I really wanted a beautiful dress like my daughter's Vogue 8997.  In fact, I was downright sad.  My husband chairs the hospital foundation board, and he would be in the spotlight all night, giving speeches and handing out awards.  I was sorry that he would have such a dumpy date.  Where was MY fairy godmother?!

Before I knew it, I was trying on my daughter's dress.  I felt like a little girl in mommy's closet!  Guess what?  It fit!  Yeah, it is three cup sizes too big for me, but it wasn't really noticeable.  About that time, Steve walked in and said "I think you should wear it.  It looks great."  So I did.
With my Prince Charming
Source

Not only did I get many, many compliments, I was able to have fascinating conversations all evening: about sewing your own clothes. People were amazed that a regular mom like me could sew a lovely dress that fit.  They all told me how disappointing the RTW gowns are, and how hard it is to find one that fits.
Source

At one point during dinner, Steve sent a text to our daughter with a picture of the two of us.  "Is that my dress?  It looks like my dress!"  I told her that it was very popular and several magazines and newspapers had photographed us during the evening.  It's going to be famous, I joked. "Well, I need it clean by Tuesday!"
with sisters Josetta and Veronica
Source

I'm returning the Calvin Klein jacket today.  I hope the same sales lady is there, so I can tell her all about the dress that I made.

Wednesday, November 12, 2014

Finally: Pictues of Vogue 8997

My bathroom remodeling project is taking all my spare time, and I haven't had even a few minutes (or the energy) to upload pictures.  Unfortunately, my husband took most of the pictures that evening, and he didn't style the gown very well.  I'm sure he was focused on the face.

Front View, in the gallery next to the concert hall
Back view.  The flash really lights up the taffeta.

I was more than a little disappointed to see young women wearing super short skirts, when the dress code clearly stated "full length skirt".  After chiding myself for spending so much time on a gown that she may not have needed, I calmed myself by thinking "She is wearing the nicest dress on that stage."  She may have been wearing the nicest dress in town (on a Tuesday evening).

My attempts to photograph her on stage were not successful.
The taffeta lined with cotton broadcloth moves beautifully.
Too bad you can't really see it.

Some details.

The sleeves: were underlined with black silk organza.  The lace was fairly substantial, and I toyed with only using lace, but felt that the organza would offer a some protection since this is a dress that will be worn many times.  I didn't want an elbow to come poking through. Also, the organza added just enough color.
Thread-traced sleeves (before adding gussets).
I finished the seams with silk organza bias cuts that were dyed with coffee.  It's a perfect shade to blend with her skin tone, and a tad darker than a tea-stain.  Adding vinegar helps set the stain/dye in silk.  The bias strips disappear when worn.  They're not even really noticeable against the white background below.

The skirt: Stephanie wanted a taffeta skirt, since she is accustomed to borrowing mine and really likes the scroop.  I suppose it's like wearing a bell around your neck: everyone hears you coming, and they turn to watch.  Or at least it's fun to imagine they are.  We considered silk taffeta, because I really like sewing with silk and Stephanie really likes wearing it.  However, we needed 7 yards for this skirt.  It's very full, and I did add eight inches to the length.  So, we are happy with the nylon/poly taffeta that I found On Sale.  The additional 8 inches were just tacked on to the bottom of the pattern.  The "lengthen/shorten here" line just was not the right place for eight inches.  Although it added a lot more fabric, for a full skirt like this one, it worked out perfectly, multiplying the flare.
The sketches are interesting, aren't they?
Skirt lining: My internet order for the skirt lining was cancelled by the retailer late in the sewing process, so I ended up lining it with a lightweight cotton broadcloth that I had in my stash.  I had to piece it in order to get enough, but who is going to know.  (Other than you and me?)  I just couldn't bring myself to sew the icky lining that the chains sell (no Bemberg available locally).  Although the broadcloth adds quite a bit of weight to the dress, it also adds some nice volume and it's got to be comfortable to sit on cotton.

It was so much fun to see Stephanie playing with the university symphony.  I was reminded of the times that I took my little girl to the performances.  Shortly before the concert started, a large group of giggling college kids came in, sitting in front of us. My mother frowned and said "Oh, I don't what that noisy bunch sitting here."  I smiled and said "Those are Stephanie's friends from the dorm."  What could be better than your own cheering section?


Wednesday, October 8, 2014

Update on the Muslin (it did fit)

Many thanks to those of you who offered your help with my fitting woes.  It was great to know I had friends who wanted to help!

The good news is that I have been very busy sewing over the last week.  I did take the muslin to my daughter's dorm and it fit.  Yippee!  The princess seams needed a nip and tuck near the sleeves. My gusset hypothesis was incorrect -- the stranger shaped gusset resulted in a much nicer fit.  Note that I did my best to crop out as much of the dorm room background as possible!
Left side just didn't hang right.  Right side was
fine with a tuck at the top of the princess seam.

She scowled when I asked her to "play the violin".
"Seriously?  M-O-O-O-O-M, it fits!"
So the next seven days were spent madly cutting out the silk organza, the crepe de chine, the lace, hand basting and thread tracing, then piecing it together.  I had no idea how hard it is to successfully sew with a heavy corded lace.  Most seams had to be lapped and appliqued, which I would have enjoyed if time were on my side.   However, I had a lot going on over the last week, and I almost didn't make it.  Scheduled medical tests, unscheduled tornado warnings and a political rally all drained my time.  Luckily, my husband picked up the slack by doing the grocery shopping and more than his fair share of help around the house, and the dress is now "wearable" for this evening's concert.
The artificial light makes the taffeta look purple, but it's really black.
At 9 PM yesterday, I finished sewing the skirt lining to the zipper and declared it ready to go.  The crepe de chine bodice lining is not yet sewn in, and I would like to re-align the upper part of the zipper before I do that.  I was also a bit leery of trimming all the sleeve seams before we had even a single fitting of the dress.  

From my grandmother's sewing basket.
I did make sure there were bra carriers in place at the shoulder seams.  They will be easy to move when I put the lining in.


My husband thinks I'm crazy for re-doing the zipper, but after all the work that went into this, I consider it a bit of a masterpiece, and I do want the finished product to be perfect.  He thinks I'm quite mad, actually, after seeing me over the last week.  I got a lecture on project planning and deadlines.  Trust me, I know this pushed the limits of my capacity.

I really love the midriff details!

I draped four separate pieces of lace over the bodice and lapped at the center front, shoulders and side seams.  It took me several hours of trying different layouts before I had the nerve to cut into the lace.  It really wasn't that hard to align it all nicely, just time consuming since it had to be tacked down by hand.  I could have zig-zagged on the machine, but felt I had better control with hand-stitching.

The sleeves are underlined with black silk organza -- no crepe de chine -- so they're slightly transparent.  The lace was probably heavy enough to use without the organza, but I felt the visual transition from all black on the bodice, to mostly transparent on the sleeve was too stark.  The gussets are crepe de chine with lace, no organza, as I didn't want them too stiff.

More details and final pictures later!

Wednesday, October 1, 2014

High Anxiety

I've always been an "anxious" person, but sewing is one of those things that usually calms me.  Until I start digging myself a hole that starts spiraling to hell.

Well, the changes to the muslin were not completely successful.  In fact, the phrase "epic fail" comes to mind.  Stephanie tried to tell me "everything is fine".  So I took a picture for her.  "THIS is fine?  You want to wear THIS?"  I admit my voice was raised.  A perfect storm of disappointment in my sewing skills, the realization that we were really close to a deadline (and she wouldn't be home next weekend for another fitting), as well as the fact that I'm remodeling a bathroom, pushed me over the edge.  As my son watched from the couch, he calmly suggested buying a dress for her.  Why didn't I think of that?!

I thought I got rid of all that extra gaping.  

Once we calmed down a bit, I took an assessment of what changes were needed:
 - more room in the shoulder cap
 - increase width at shoulder seam
 - add height to side back armscye
 - add a sleeve gusset or add a lot of height to the sleeve and armscye
 - there appears to be too much fabric above the bust, but that is partially caused by the sleeve pulling the bodice off her body, pinched out some anyway.
 - the neckline still gaped a tiny bit, but I think I can ease that out with ease-stitching the seam allowance and some stay tape.

My husband offered to take our son to a movie, and I sat down and tried to figure out where I went wrong and how to correct it.   Having a cup of coffee, was probably a mistake.  I panicked.  I pulled out the inspiration dress and started doing a knockoff of the bodice (it's two pieces with a few darts, how bad could it be?).  10 minutes into that exercise, I realized I was crazy and abandoned it.  I briefly considered recutting the bodice with the original pattern, which had no problems other than a slightly tight armscye.  But we didn't really like the neckline.  Do I have another TNT bodice that I could substitute?  I was pretty wound up.  So I shelved it for 24 hours.

After finishing the work I get paid for on Monday, I pulled it out again and gave it a fresh look.  The gusset was really my first choice for increasing her range of motion.  I probably could redraft the sleeve with little wings to build in the gusset, but it's a bit late in the game to experiment.  A gusset worked during the fitting, keep it.  Latest changes include:
 - Redrafted sleeve with more room in the cap
 - Redrafted the front/back bodice pieces with a tad more room in the shoulder
 - Extended the armscye of the side back piece about 3/8"
 - Created a gusset
How can we be missing that much room in the armpit?

Since I doubted my skills so much more than usual, I spent way too much time researching gussets. Should it be square/angled or "football" shaped?  In the end, I just went with the shape that I pinned in to cover the gap in the muslin.  As you can see, it is roughly a russet potato.  A russet gusset.

I did a terrible job marking my gusset, so I had another little meltdown trying to sew it to the new sleeve and bodice. ("Is this the top or the bottom?  Does this attach at the notch or a random location? Wahhhhhhh!)  Pin, unpin, pin again, unpin again.  Hand baste.  It's a very fiddly spot to try to sew with a machine.

Also, there's an odd little curve to the gusset piece on one side.  I left the weird curve in on the right sleeve, and smoothed it out on the left just to test if I needed it, or if it was a mistake.  My hypothesis is that the weird curve adds problems.  I know I said no more experimentation, but I can't help myself.
Gusset with smoothed curve from below. 
from side

Muslin #4?  Who's counting, anyway. The left sleeve
seems to hang nicer than the right.  Probably that odd curve!
I felt a lot better doing something, rather than worrying about what I needed to do.  It gives me a little bit of control to think I'm making progress.  I know it's just the illusion of control, but sometimes a placebo is all I need.

Now I need a fitting on the real body.  I'm working that out.  This weekend she has a "leadership retreat" and won't be able to come home. The concert is one week from today.  Okay.  More panic. Can I come down there?  No answer.  I'm sure her dorm room is a mess and she doesn't want me near it.  I offered to meet her at Walmart and try it on in the ladies room. The handicapped stalls have plenty of room, and the light is pretty good.  Fitting a muslin is probably one of the least weird things that has happened in a Walmart bathroom.


Tuesday, September 30, 2014

The Symphony Dress Begins

I have an admission: I'm a little lonely now that my daughter has moved into the dorms.  My husband and son are good company, but my daughter shares many of my interests, and added so much vitality to our home. I also missed sewing for her.  

Not for long: she needs a gown for the university orchestra.  We really liked a RTW dress that she wore for high school orchestra, but a full length, all black gown is now required.


The inspiration dress

Vogue 8997 caught my eye last spring.  It's very feminine, with a great V-neck.  Love the full skirt, with the trim waistline!

And View C?  Well, wouldn't it make a perfect long dress?  Taffeta skirt with a lace bodice and we have a gorgeous dress.  


Vogue 8997, View C
Of course, we need to add 3/4 sleeves, which is also conveniently included, in View F.  


Once you put those elements together: 3/4 sleeves, full skirt, black fabric...I imagine a nun's habit.  In lace, but still a bit austere.  

I was greeted with a nice surprise when starting the muslin: Vogue 8997 is a "custom fit", meaning no FBA is necessary.  It looked like she'd still need a size 12 for the bust, 10 for the waist, but I accidentally marked a size 10 everywhere.  Realizing my mistake after several pieces were marked and cut, I just went with the 10, expecting to let out some of the seams.  I was also a bit concerned about the sleeve fitting, so I only attached one.  Lo and behold: it fit almost perfectly! 


Muslin #1 (size 10/D).  Head removed due to bad hair day.

It's been a long time since I had a muslin ready to go after one fitting.  Honestly, I didn't know what to do.  Well, I needed to add 8 inches to the length, but the hard stuff to fit all fit really well.

We were both so thrilled that we didn't need any more fittings! She was getting ready to take it off, when she mentioned that the neckline was a little too high for her.  Yeah, okay.  I'll lower it an inch. 

Easy change, right?  Well, of course not.  Now the neckline gaped.  Pinch out the excess, rotate the darts.  So the next weekend, when Stephanie came home to teach violin lessons, we had another quick fitting, and the sleeve ripped out at the armscye.  She does need to move both arms in this dress, after all. And the neckline still looked too high.

Take 3: redrafted the front and front side bodice with an even lower neckline and higher armscye. I had a feeling that a gusset would probably work better, but wasn't sure how big to make it, since I didn't have my fit model on hand. 

The lower neckline does improve the overall look quite a bit.  While waiting for her to come home for the next Sunday lessons, I admired the design lines of this dress.  

Muslin #3.  I hope it fits the girl as well as the dress form.

Monday, August 25, 2014

Alison Swimsuit Parts 2 and 3: The Two Piece and The Pageant Suit

Vintage Simplicity 1302
I had so much fun with the Alison swimsuit for my daughter, that I just had to make another one.  I did promise her a two-piece, after all!  Swimsuit sewing is one area that you really can save money by making your own.  For the same price that I would have paid for a single swimsuit at a 40% discount, I got enough fabric and supplies to make two.  And they both fit my daughter, a feat that the department store is unable to accomplish!

The size adjuster is in a terribly distracting position...
Using the same navy polka dot and red spandex also used in the one-piece, I drafted a two piece version of the BurdaStyle Alison.  She wanted a retro design, so I used a photo of a vintage Simplicity swimsuit (1302, above) as our model for the top.  It is very similar to the design of the Alison, and required few changes from that pattern:
  • Increased the width and height of the bust insert
  • Instead of using the flat neckline of the Alison pattern, I sculpted the front for more of a sweetheart and added elastic.  I'm not sure that elastic is necessary -- my thoughts were that it was a deeper neckline, and it would add a little "security".
  • Increased the length of the shoulder strap, so it could be tied at the neck 
  • Added a band under the cups to secure the bottom of the top
  • Used firmer bust cups in this version, although I still had a hard time finding the best size locally. 
  • This version's top is lined in swimsuit lining -- the one-piece was self-lined, which seemed heavy to me
The bottom was super easy, as I just used the bottom 8 inches or so of the Alison and added elastic at the waist.  It is in the navy/white polka dot fabric.  I also lined the bottoms with swimsuit lining (the one-piece was lined only in the crotch and bust), which apparently made it more comfortable, as well as less transparent when wet.  Although I did not notice any "problems" with the original unlined torso of the first suit, which she wore on vacation at a water park.  

Unfortunately, I don't have any pictures of the briefs, because my daughter left for college, taking the suit with her! I'm told "it is perfect."  It was worn on a float trip and for bluff jumping.  I'm glad I didn't know about the latter until after-the-fact.  

Suit #3 was a "pageant" swimsuit.  I don't have any pictures to share with her in it, as she doesn't want those on the internet, and she's probably right.  Let's just say that it really accentuates her positives.  
I had a hard time dressing the mannequin.
The bottom would just not go on easily!
We ordered some vibrant raspberry spandex from Spandex House several weeks in advance, but two days before the pageant it still hadn't arrived, so we bought more of the red from Hancock and I whipped up a slightly different one-piece version of Alison.
  • Neckline is similar to the two-piece top, with slightly more plunge
  • Leg openings are cut higher on the outside of the thigh
  • Lengthened the torso by about 2 inches, which better aligned the bust of the suit with her bust.  She does not have a long torso, so I didn't even consider doing this with the first version.  
  • Bought some power net that we considered using, but instead just used regular swimsuit lining turned so the direction of greatest stretch ran lengthwise instead of crosswise, which gave surprisingly more support than I anticipated.
It looked great on her, and I saved $200 from the price of the least expensive pageant suit that I could find.  


Back: It really is straight, and yes, I stole Tilly's Bow Back Nettie idea!
For these two suits, I used only my Bernina 930.  My serger doesn't do a cover stitch, so rather than switch back and forth, I kept it all on one machine.  I used one of the stretch stitches on the two-piece, but only the regular zig-zag on the third suit, which I think I liked best of all.

Stephanie begrudgingly participated in the county pageant, as a condition of getting some money for college from my dad.  His intention was for her to build confidence -- which it eventually did.  She won Crowd Favorite and Spirit of the Community awards (and second runner-up).  A huge shock to her, after hoping that "they don't announce last place."  She also met a lot of super sweet girls who gave her some great advice, since it was her first pageant (and most likely her last).  
Accepting her "Spirit of the Community" award
for exceptional community service.  Source
She really dragged her feet to prep, and the day before the event, she found out the loaner gown she had lined up was not available. Instead, she wore this year's hand made prom dress for her evening gown.  I was a little concerned that it didn't have any bling, but she fit in just fine with the older age group (surprisingly, the younger ones had the flashier dresses).

The event symbolized the end of an era for us, since she left for college the next morning.  It was a great send-off, especially when she saw a blue ribbon on her gluten free cookies! She was afraid she'd get last place on those, too.


At the Best of Show case. 


Tuesday, August 19, 2014

The Alison (Burda Style) Swimsuit

Image: BurdaStyle.com
Keeping with the Need to Sew theme, my daughter NEEDED a swimsuit.  We shopped RTW first, even dragging little brother along to add to everyone's torture.  After trying dozens of suits, we found nothing that gave her decent coverage in the chest.  

Swimsuit shopping can be so brutal!  During a good cry in the Dillard's dressing room, I assured her that I could make her something to FIT.  So we headed across the parking lot to Hancock Fabrics.  Within a few minutes, girlfriend was smiling again, having found a super cute navy/white polka dot spandex that she paired with a cheery red.

"Sure, I can sew a suit that fits you!"  Although I never have sewn one before, I remembered an email Burda Style sent me advertising their Alison swimsuit (formerly free) for $3.99 with a free webinar.  I've never taken a Burda Style webinar, but I do love Craftsy, so it sounded like a great way to make a first swimsuit.  Never mind that Stephanie wanted a two piece, I really wanted to make this one!
Additional length in the torso would have better aligned the bust.

First, my quick review of the pattern:
  • The instructions that come with the pattern are minimal and steps are a bit out of order (IMO).  I have read that the initial free pattern had no instructions, so this is an improvement.
  • There are no notches.  Most of the pieces are fairly easy to figure out, but not all. For anyone who has made a swimsuit before, it's likely not a problem.  I created a few match points for myself, which did help keep things straight.  If you're pattern matching, take care to walk the pattern pieces and mark notches. 
  • Many of the pattern pieces should be cut on the fold, but it is not stated as such.  I caught one mistake (crotch piece), but missed the back strap, which would have been way too short to tie a bow (pic below) anyway.  My version has a hook that connects two shorter straps, instead.
  • One pattern piece is not labeled, but it was easy to figure out it was the front tab.
  • No marks or suggestions for gathering the bust insert.  I followed the directions of the webinar, but looking at the final product, I should have gathered more fabric.
  • I missed the instruction to add 3/8" SA to the legs for elastic.  Since 5/8" SA were already included, I'm not sure why this wasn't already done.  My daughter is fine with the higher leg, but if you want a more retro leg, add 3/8".
  • Although it is a print-at-home PDF, there are less than 10 pieces of paper to paste together and tracing was quick, because the pattern pieces are not complex.
  • It's a flattering final product.  I'd definitely make it again, even if I cursed it several times during the first version.
  • There is very little elastic used, only around the legs.  All other edges use fabric banding.  In my opinion, this is a more comfortable option.  I think I may have over-elasticated the back a tiny bit.
Image: BurdaStyle.com
My back strap was only about 5" long and definitely too short for a bow.


As for the "webinar", it was more of a narrated film strip, nothing like a Craftsy class. I can't complain too much, since I paid only $3.99 for pattern and class, and it did give pretty good instructions to help me figure out how to put the suit together correctly.

Given that we regard this first version of our swimsuit a wearable muslin, it came out pretty darn cute. I need to add length to the torso, and it could still use more fabric at the bust.  My "FBA" was nothing more than forcing the size L bust insert into the size M front/back.  We really needed an XL or an XXL (not included, so I will need to draft it).  That's why toiles were invented, non?

This is a very flattering swimsuit style, and the process made me realize that swimsuit construction is not that scary.  I used my serger for part of the construction, and my Bernina 930 to baste some seams and apply the leg elastic.  

We may never shop for swimsuits again!  On to the two piece...


Updated 2/13/2022: Links to instructions and pattern. 

Tuesday, July 22, 2014

A "Need to Sew" Basis: McCall's 6124

In preparation for my daughter's Prom dinner in late April, which was soon followed by a graduation party in mid-May, my sewing room was stripped of sewing materials, boxed up and stored in my husband's home office.  Okay, so the sewing room is also our dining room.
I completely understand why someone would want to get rid of this mess.
Husband then told me his great idea for creating a sewing room all my own, made possible by a series of moves: (1) building a new home office on the first floor, (2) moving my daughter's room to the old office, (3) moving my son to my daughter's old room and (4) creating a wonderful sewing spot for me in my son's old room.  "So, you may as well leave everything boxed up until we're ready to move."  Which would be late August, at the earliest. As slow as we move, it would probably be next August.

Although slightly intrigued by the idea of designing a perfect sewing room from scratch, I really just wanted to SEW NOW, but with my supplies and tools stored upstairs, I'm restricted to what really NEEDS to be sewn.

Luckily, my daughter's summer job required a button-down shirt.  Her manager suggested she buy it in the young men's department at Penney's.  What!?  We even had trouble finding a well fitting button-down shirt in the ladies' section: either too baggy in the shoulders or too tight in the chest.

Mom to the rescue!  I picked through the boxes stored on the second floor to find my scissors, seam ripper, measuring tape and pins.  Just the essentials.  We found McCalls 6124, which is not a button-down shirt, but that's an easy fix.  It doesn't have a yoke, or a shaped bottom hem, but it does have princess seams.
McCall's 6124
I have never been comfortable wearing a fitted dress shirt.  They always feel tight across my back and chest, and usually baggy around my waist.  I ordered some stretch shirting to alleviate the tight factor.  We were given a few approved colors, all of which were pastels, none of which are the most flattering on Stephanie, who looks better in bolder colors.  Rules are rules, though.

Since this was to be my first button-up/button-down, I ordered some relatively cheap fabric from Denver Fabrics, which was rather disappointing.  First of all, it has a very stiff drape, a "spongy" feel, and wrinkles easily.  Most importantly, and most annoying of all, there were many different shades of baby blue to be found on the one contiguous piece of fabric I received.  Even though I cut it using the "with nap" layout, the two back pieces are clearly different colors.
Left center back is a few shades darker than right center back.
I wasn't completely pleased with the outcome of the shirt, but I'm not sure if it's due to the pattern, my FBA or the poor quality shirting fabric.  I am willing to give the pattern another go, next time with some nicer quality shirting from Mood.  [That fabric is took too long to ship, and her summer job is winding down, so I won't be making another one for her].  I wouldn't mind trying one of the longer styles for myself -- they have a nice flare, and I imagine they would look cute with leggings.  If I wore leggings.  Never mind.
Isn't it cute?  I may learn to like leggings, after all.
What would I change next time? Princess seams: there is built-in ease on the front piece, that I was not able to steam out.  It's not enough ease that it looks shirred, only enough to make it look like you don't know how to sew.  Next time, I'd either increase it or remove some.
Buckled princess seam
The barrel sleeve feature is not per the pattern -- I accidentally cut one sleeve too short (don't ask) -- so this is my fix.  I actually like it though.

I thought there was too much ease in the sleeve cap, at least for this fabric.  If I make it again, I will reduce the ease, or make sure I can steam it out.  It just didn't look right to me.

Other changes I made, were to shape the bottom hem, flat-felled the seams and edgestitched/topstitched the collar, band and plackets.

Used a RTW shirt as a guide for the shape of the hem.
The pattern is a straight bottom hem.
Even with the problems, it looks really cute on Stephanie, and fits her better than the RTW shirts that we found.  Her co-workers like it as well.  The ladies wanted to know where she found such a nice fitting shirt!

This project intrigued my husband, in terms of the stretch shirting. "Can you make a dress shirt for me?"  He also ordered some from Mood.  Perhaps I will soon have an important enough project to get the rest of my supplies moved back to the dining room!