Monday, August 25, 2014

Alison Swimsuit Parts 2 and 3: The Two Piece and The Pageant Suit

Vintage Simplicity 1302
I had so much fun with the Alison swimsuit for my daughter, that I just had to make another one.  I did promise her a two-piece, after all!  Swimsuit sewing is one area that you really can save money by making your own.  For the same price that I would have paid for a single swimsuit at a 40% discount, I got enough fabric and supplies to make two.  And they both fit my daughter, a feat that the department store is unable to accomplish!

The size adjuster is in a terribly distracting position...
Using the same navy polka dot and red spandex also used in the one-piece, I drafted a two piece version of the BurdaStyle Alison.  She wanted a retro design, so I used a photo of a vintage Simplicity swimsuit (1302, above) as our model for the top.  It is very similar to the design of the Alison, and required few changes from that pattern:
  • Increased the width and height of the bust insert
  • Instead of using the flat neckline of the Alison pattern, I sculpted the front for more of a sweetheart and added elastic.  I'm not sure that elastic is necessary -- my thoughts were that it was a deeper neckline, and it would add a little "security".
  • Increased the length of the shoulder strap, so it could be tied at the neck 
  • Added a band under the cups to secure the bottom of the top
  • Used firmer bust cups in this version, although I still had a hard time finding the best size locally. 
  • This version's top is lined in swimsuit lining -- the one-piece was self-lined, which seemed heavy to me
The bottom was super easy, as I just used the bottom 8 inches or so of the Alison and added elastic at the waist.  It is in the navy/white polka dot fabric.  I also lined the bottoms with swimsuit lining (the one-piece was lined only in the crotch and bust), which apparently made it more comfortable, as well as less transparent when wet.  Although I did not notice any "problems" with the original unlined torso of the first suit, which she wore on vacation at a water park.  

Unfortunately, I don't have any pictures of the briefs, because my daughter left for college, taking the suit with her! I'm told "it is perfect."  It was worn on a float trip and for bluff jumping.  I'm glad I didn't know about the latter until after-the-fact.  

Suit #3 was a "pageant" swimsuit.  I don't have any pictures to share with her in it, as she doesn't want those on the internet, and she's probably right.  Let's just say that it really accentuates her positives.  
I had a hard time dressing the mannequin.
The bottom would just not go on easily!
We ordered some vibrant raspberry spandex from Spandex House several weeks in advance, but two days before the pageant it still hadn't arrived, so we bought more of the red from Hancock and I whipped up a slightly different one-piece version of Alison.
  • Neckline is similar to the two-piece top, with slightly more plunge
  • Leg openings are cut higher on the outside of the thigh
  • Lengthened the torso by about 2 inches, which better aligned the bust of the suit with her bust.  She does not have a long torso, so I didn't even consider doing this with the first version.  
  • Bought some power net that we considered using, but instead just used regular swimsuit lining turned so the direction of greatest stretch ran lengthwise instead of crosswise, which gave surprisingly more support than I anticipated.
It looked great on her, and I saved $200 from the price of the least expensive pageant suit that I could find.  


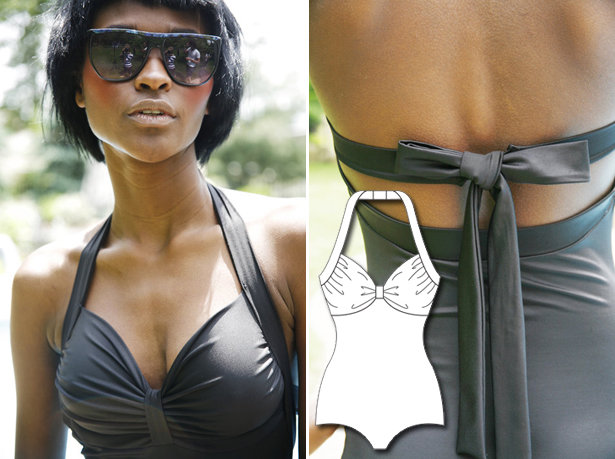
Back: It really is straight, and yes, I stole Tilly's Bow Back Nettie idea!
For these two suits, I used only my Bernina 930.  My serger doesn't do a cover stitch, so rather than switch back and forth, I kept it all on one machine.  I used one of the stretch stitches on the two-piece, but only the regular zig-zag on the third suit, which I think I liked best of all.

Stephanie begrudgingly participated in the county pageant, as a condition of getting some money for college from my dad.  His intention was for her to build confidence -- which it eventually did.  She won Crowd Favorite and Spirit of the Community awards (and second runner-up).  A huge shock to her, after hoping that "they don't announce last place."  She also met a lot of super sweet girls who gave her some great advice, since it was her first pageant (and most likely her last).  
Accepting her "Spirit of the Community" award
for exceptional community service.  Source
She really dragged her feet to prep, and the day before the event, she found out the loaner gown she had lined up was not available. Instead, she wore this year's hand made prom dress for her evening gown.  I was a little concerned that it didn't have any bling, but she fit in just fine with the older age group (surprisingly, the younger ones had the flashier dresses).

The event symbolized the end of an era for us, since she left for college the next morning.  It was a great send-off, especially when she saw a blue ribbon on her gluten free cookies! She was afraid she'd get last place on those, too.


At the Best of Show case. 


Tuesday, August 19, 2014

The Alison (Burda Style) Swimsuit

Image: BurdaStyle.com
Keeping with the Need to Sew theme, my daughter NEEDED a swimsuit.  We shopped RTW first, even dragging little brother along to add to everyone's torture.  After trying dozens of suits, we found nothing that gave her decent coverage in the chest.  

Swimsuit shopping can be so brutal!  During a good cry in the Dillard's dressing room, I assured her that I could make her something to FIT.  So we headed across the parking lot to Hancock Fabrics.  Within a few minutes, girlfriend was smiling again, having found a super cute navy/white polka dot spandex that she paired with a cheery red.

"Sure, I can sew a suit that fits you!"  Although I never have sewn one before, I remembered an email Burda Style sent me advertising their Alison swimsuit (formerly free) for $3.99 with a free webinar.  I've never taken a Burda Style webinar, but I do love Craftsy, so it sounded like a great way to make a first swimsuit.  Never mind that Stephanie wanted a two piece, I really wanted to make this one!
Additional length in the torso would have better aligned the bust.

First, my quick review of the pattern:
  • The instructions that come with the pattern are minimal and steps are a bit out of order (IMO).  I have read that the initial free pattern had no instructions, so this is an improvement.
  • There are no notches.  Most of the pieces are fairly easy to figure out, but not all. For anyone who has made a swimsuit before, it's likely not a problem.  I created a few match points for myself, which did help keep things straight.  If you're pattern matching, take care to walk the pattern pieces and mark notches. 
  • Many of the pattern pieces should be cut on the fold, but it is not stated as such.  I caught one mistake (crotch piece), but missed the back strap, which would have been way too short to tie a bow (pic below) anyway.  My version has a hook that connects two shorter straps, instead.
  • One pattern piece is not labeled, but it was easy to figure out it was the front tab.
  • No marks or suggestions for gathering the bust insert.  I followed the directions of the webinar, but looking at the final product, I should have gathered more fabric.
  • I missed the instruction to add 3/8" SA to the legs for elastic.  Since 5/8" SA were already included, I'm not sure why this wasn't already done.  My daughter is fine with the higher leg, but if you want a more retro leg, add 3/8".
  • Although it is a print-at-home PDF, there are less than 10 pieces of paper to paste together and tracing was quick, because the pattern pieces are not complex.
  • It's a flattering final product.  I'd definitely make it again, even if I cursed it several times during the first version.
  • There is very little elastic used, only around the legs.  All other edges use fabric banding.  In my opinion, this is a more comfortable option.  I think I may have over-elasticated the back a tiny bit.
Image: BurdaStyle.com
My back strap was only about 5" long and definitely too short for a bow.


As for the "webinar", it was more of a narrated film strip, nothing like a Craftsy class. I can't complain too much, since I paid only $3.99 for pattern and class, and it did give pretty good instructions to help me figure out how to put the suit together correctly.

Given that we regard this first version of our swimsuit a wearable muslin, it came out pretty darn cute. I need to add length to the torso, and it could still use more fabric at the bust.  My "FBA" was nothing more than forcing the size L bust insert into the size M front/back.  We really needed an XL or an XXL (not included, so I will need to draft it).  That's why toiles were invented, non?

This is a very flattering swimsuit style, and the process made me realize that swimsuit construction is not that scary.  I used my serger for part of the construction, and my Bernina 930 to baste some seams and apply the leg elastic.  

We may never shop for swimsuits again!  On to the two piece...


Updated 2/13/2022: Links to instructions and pattern.