Friday, December 11, 2015

The Anderson Blouse

My days have become very busy with non-sewing projects, but I managed to sew three new tops for my daughter's trip to the Czech Republic in November.  Two of which are identical cousins made with Sew Over It's Anderson Blouse Pattern. Forgive my lack of pictures -- my daughter had a cold and didn't want to pose before leaving town.
Sew Over It Anderson Blouse
Believe it or not, this is the first time I've ventured into the realm of sewing an independent pattern.  Even though it involved printing and tracing a PDF, it was an overall pleasant experience.

In search of a flattering style that Gillian Anderson wore frequently in the 1990's X-Files episodes, and which Robin Wright has worn a time or two on House of Cards, I was disappointed not to find anything in the Big 4.  Imagine my excitement when I realized that someone else liked the blouse on Gillian Anderson so much that she drafted a pattern!  Apparently, they have reappeared in the BBC series "The Fall".

My only trouble with the pattern was likely due to my ancient ink jet printer that selectively leaves out important parts of print jobs.  At times it is everything within the bottom 3 inches of a page, but in this case it was important notches and lines, so there was a lot of reprinting.  I would have liked to have the bust apex marked, and perhaps the waist to help with the fitting process.  Perhaps my printer left those things out, also.

"Don't show my face!"
The pattern is fairly simple, with only front, back (cut on fold), sleeve, cuff and bias binding for back neckline.  The cuff is narrow with a vent that is finished with a narrow hem that corresponds with the sleeve seam.  I made minimal changes to the pattern.
The only true alteration needed was an FBA. My guess is that many people would be fine without it.  I started with a size 10, and added about an inch at the bust line by pivoting the armscye.  I just cut the pattern along the seam allowance, leaving a hinge at the outer shoulder point, then pivoted the underarm out.  That leaves a wedge along the side seam that needs to be filled in as well, which I tapered down to the notch (picture below). The muslin was a little wide in the shoulders, so I just pulled that 1/2" into the existing shoulder gathers, which also helped with an FBA.  It seemed to fit very comfortably.

The narrow, delicate cuff is a nice feminine touch.  I shortened the length of the cuff on the second blouse (and added another pleat to the sleeve) because my daughter's wrists are so thin.  I interfaced the cuffs of both versions, out of concern for making a buttonhole in delicate silk.  A lightweight fusible was used on the white blouse and silk organza cut on the bias on the red blouse.  The organza version was much easier to work with and came out much nicer.

Anderson #1 was sewn in a lovely, but very thin silk charmeuse.  If I had to do it again, I would order a heavier-bodied fabric, although it seems fine on a human, even without a camisole. On the dark gray dress form it is more transparent.


Anderson #2 was sewn with a gorgeous red silk crepe that I bought on ebay a few years ago, provenance unknown.  It was advertised as crepe de chine, but I think it was so much more luxurious than any silk crepe de chine I've ever sewn before.  Such a joy to sew with, that I didn't want the project to end.  I need to find more fabric like that!

I also cut extra bias binding to encase the armscye seams and the entire shoulder seam, as well as the back neckline.  Side and sleeve seams were clean finished with French seams. Although I overlocked the raw edge of the front neckline facing on the white shirt, I used a narrow hem on the red shirt and it lays much flatter.
I like the way the blouse peeks out from the suit jacket.

Another minor change, was that I did not create the casing for a drawstring as in the pattern instructions. It didn't seem necessary, as it would be worn tucked into a skirt or slacks, and I imagined the drawstring getting in the way.  The front necklines are tacked together with catch stitches.  I first tried covered snaps, but they were heavy, dragging the silk down.

I think my daughter liked these blouses, and I expect that at some point I will make more for her, as they're elegant and versatile. It's a simple pattern that can be sewn into a luxurious blouse with the right fabric.  Meanwhile, my husband and I have started watching The Fall on Netflix.

Friday, October 2, 2015

Experiments in Sewing - The Paper Gown

Shortly after wearing my daughter's dress to last year's Charity Ball, I began the hunt for a gown that I could sew for the 2015 event.  I found this treasure: Burdastyle Hourglass Lace Gown (11/2014 #121).  I'm not sure what I was thinking when I picked it out in February. It has long sleeves?  It's fitted? Maybe it was on sale.
Does it seem a little too "bombshell" for me?

I finally got the nerve to print out the PDF (64 pages!), but my tracing paper was nearly gone.  While looking for an online source, I came across Swedish Tracing Paper, and I was apparently taken in by the clever marketing: 
  • "Drapably soft, yet strong enough to sew on!" 
  • "Sew the paper pattern and try it on before cutting out your expensive fabric."  
I would have made a toile, anyway, but my muslin stash was also out of stock.  Hmmm, this kills two birds, with one stone.

Well, not really.  You must trace your pattern twice, and the paper is not at all drapable.  It is really a stiff interfacing.  Although it is technically sewable, it tears easily, especially when ripping out stitches.  Admittedly, it is easy to fix a tear by ironing on fusible interfacing.

Adding to my distaste of the tracing paper, the instructions for this pattern were terrible.  I still haven't figured out how the author intended to have the bust cups inserted with lining (I planned to line it by hand, anyway).  I inserted the yokes backwards, and sewed the front pieces incorrectly.  I found the naming conventions difficult to reconcile (what is the difference between "front center" and front middle")? 

After putting the paper gown together, complete with an invisible zipper, I asked my husband's help in zipping it up.  
"It won't zip up all the way." He seemed to struggle with it.
"It zipped up for me just fine.  Is it caught in the paper?  Don't tear the paper!"
More struggling, then he pulled so hard the zipper pull flew right off the top of the zipper.  "I didn't know a zipper could do that." He answered, dumbfounded.  
No photos of me wearing it.

So after unpicking the zipper and sewing in a second, we tried it again. It may be the fact that it is made with paper, instead of a nicely draping fabric (or even a poorly draping fabric), but I couldn't get it off quickly enough after seeing it in the mirror.

I'm not sure why I hated it.  Was it because the yokes were so wide set that I knew the shoulders and sleeves would slip off and annoy me?  Maybe because I could see right through the paper and hated what I saw underneath?  Maybe I expected it to look as good on 5'5" me as it did on a 6' model? Or perhaps I felt as though I had draped myself in Austrian blinds.
Maybe because I felt like I was wearing this.

It is still on the dress form in the dining room, because I hate to give up on it just yet. I could easily extend or shift the yokes toward the center, but I am not sure I want to, so I am searching for an alternative.  I have such a hard time sewing for myself.  I am not sure why!

The good news is that a Joann Fabrics is opening close to home today, so I am off to buy some muslin and see what sort of inspiration I can find.


Sunday, September 20, 2015

McCall's 6884, A Faux Wrap Dress

Continuing my series of "the clothes with no one inside," I present McCall's 6884.  My daughter is wearing it for an in-service today, but I have no pictures of it on her. She told me this morning that it does fit and is "very comfortable." I thought it looked great on the dress form.
McCall's 6884 Front
This is another piece to add to Stephanie's "business" travel wardrobe.  We bought the pattern at least a year ago, and the fabric was from my stash.  It is a viscose crepe jersey originally purchased for a prom dress.  It's a vibrant red, and very cozy.
McCall's 6884 Back
It was quick to cut and sew after minimal pattern work: a nip for swayback, about 2.5" in additional hem length and what I would call a "lazy man's" FBA, which I think I saw on Marcy Tilton's blog some time ago.  I added 1 1/4" to the front length in the vicinity of the bust points, and eased the surplus into the side seam.  I admit that it was a lot of fabric to ease in a small amount of space, but the fabric was very stretchy, so it worked.  On a more stable knit, I may have to do things differently. 
McCall's 6884 Neckline Band

I recall seeing some reviews complaining the neckline was too low cut, so I added a little height when I expanded the bust.  When I draped it on the dress form after sewing the fronts to the backs, I still worried that it was too low, so instead of the narrow hem as in the pattern instructions, I added a neckline band (cut on the cross-grain).  It was stretched while sewn, so it should also help keep the neckline from drooping or gaping. 
McCall's 6884 sleeve band
Another change included adding a band at the sleeve.  After cutting the 3/4-length sleeve, it just seemed too short.  It was also baggy, even though I cut the smallest size sleeve.  Since Stephanie wasn't around to fit, I added 2" in length with a band cut on the cross-grain.  It should be just tight enough to push up or down her forearm.  You can see in the shots above and below that the sleeve was eased quite a bit when sewn to the band.
McCall's 6884
The sleeve and neckline bands add some sporty touches to it, so I hope it doesn't look too casual for Stephanie's purposes.
It is truly flattering on anyone!
I look forward to making this one again.


Friday, September 18, 2015

Le Refuge

The Huguenots were protestants who were persecuted and forced to flee France after the revocation of the Edict of Nantes in 1685.  As a religious dispute, it was a bloody business, with executions, slavery and forced conversions.  Many managed to escape and resettle elsewhere.

The word "refugee" was introduced to the English language as huge numbers of Huguenots moved into other countries. There were so many refugees, that some sources estimate over 90% of people in South East England have Huguenot ancestry.

Many of these refugees brought their skill in silk weaving to Britain, playing an integral role in the development of England's textile industry.
Spitalfields Silk

Houses in Spitalfields display spools above the doors of homes where Huguenot silk weavers resided.
Source
The Huguenots brought a wealth of talent, also sharing their skills in printing, bleaching and dying.  
Museum of London, Spitalfields Silk; source: Selvedge.org
One Huguenot family held the secret recipe for "Cardinal Red", ironically giving them a monopoly to supply cloth to the Vatican.
Source
In addition to silk, a number of Huguenots set themselves up in calico printing. Peter Mauvillain was one of the most successful, a true pioneer of the industrial revolution who employed over 200 people.
This is silk, not calico.
Museum of Spitalfields

The Huguenots may be the original refugees, but they are only one example of a dynamic migrant group that worked hard to assimilate into their adopted society and create opportunities for prosperity -- for both themselves and their hosts. 


Thursday, September 10, 2015

A Classic White Shirt: McCall's 6124

It's been tough getting myself back into the swing of sewing, at least real sewing.  There have been plenty of t-shirts to shorten and taper, buttons to replace and small tears to repair, but I sensed real trouble ahead when my husband asked "Can you remove the tags from all my t-shirts and sew up the sides again with that machine I bought you?"   OH. MY. WHAT?!  If I didn't find an in-depth project if I left myself open for the mind numbing work of unpicking the side seams of a dozen t-shirts and over-locking them back together again!

To my rescue, the Pattern Review Sewing Bee.  First challenge: a fitted, woven shirt.  "That's no problem." I told myself.  "I can whip up McCalls 6124 in a couple of days!" Of course it was Wednesday by the time I heard about it, but I easily convinced myself that I still had plenty of time to cut it out, sew it together and take pictures.  After all, the fitting work was all behind me, and I had a long weekend ahead of me.
McCall's 6124, roughly the view that I chose.

Stephanie could use a classic white shirt to wear with her suit, after all. So, I found a white linen/rayon blend and started cutting it on Thursday.  Then I got a phone call from a new client, with a "small project". That, along with sitting at the clinic with my son for three hours devoured my Friday (day and night).  It still left me three days, though.  How long can it take me to sew one shirt, with no pattern alterations required?

M6124 from 2014's waitress gig
I'm not a fast sewer.  I should know myself better by now.  I enjoy sewing slowly and thoughtfully.  That doesn't change when I'm on a deadline.  So I drove my family crazy in three days, adding opalescent top stitching to the front placket and collar stand, as well as a few other changes. I barely finished in time to submit the project after taking a few photos.

M6124 with the opalescent top-stitching on all seams.
I decided to take it off the placket & collar stand in the end.
When my daughter came for dinner on Sunday it didn't occur to me to have her pose in the shirt (the side seams were still open, anyway).  So I when I started filling out the contest form, I was dismayed to see that the front and back photos have to be taken on a human.  Damn!
One of the many off-center shots.

So I wore it, while my husband took the photos. It actually fit me fairly well, even though Stephanie is three inches taller and nearly as many cup sizes bigger (I wore her bra).  In the end, I changed into and out of the top for three rounds of photos.  For some reason, Steve was unable to take a picture from the dead center, and they all had shadows and wrinkles that weren't really there.  In one shot the left side of the collar turned up and the right side down.  "Oh, I thought you did that on purpose." He replied.  Really?  Who wears a shirt collar like that?
Finally!  Third try.
So I do not expect to make it beyond round one, given the photos I submitted.  That's okay.  I realized that tight sewing deadlines don't do me any favors.  I am just happy to get back into the swing of things with a real sewing project, and am looking for other wardrobe builders for my daughter, who will need a business capsule for an upcoming trip.
M6124
On to the review of McCall's 6124! I do like this pattern, with one exception. I'm not completely pleased that the front piece is slightly longer than the side front piece at the bust. I am accustomed to ease in the side front, instead, and it's just enough ease that it could appear that I cut it wrong or sewed it sloppily, instead of a nice shirred look. I managed to steam out most of the ease before sewing this time. If I make it again, I may add more length and shirr it.  I know I said this last time, but I didn't want to mess with changing the pattern with a relatively short timeline.

With the top-stitching unpicked in the front placket and collar stand.

The reason I chose this pattern initially, was the fitting potential with the princess seams.  I still like that, and think it's a flattering cut.  The two-piece sleeve (in the full length) also makes fitting easy and hangs naturally, as well as giving an easy placket solution.  The cuffs are simple to execute, as well.

Sleeve seams are folded and top-stitched.
I changed the shape of the hem from a straight hem, to a slightly rounded hem, by using the center front/back as the center point of the radius.  Stephanie will most likely wear this tucked into a skirt, so that design detail may be irrelevant to her, but it pleased me.
Split side seam.  I may add a gusset here, as I'm worried about strength.

Per the contest rules, I finished the interior seams nicely (which I would have done anyway).  My plan was to use flat felled seams throughout, but I found that a simple turned-in seam with top-stitching looks so much neater, so I did that with the sleeve seams and the side seams. I shortened the hem from 5/8" to 1/2", because a narrower hem looked better.

The fabric is a nice weight for a dress shirt, especially one that will be primarily worn under a jacket. I was inspired to use white after reading about Sew-to-Fit's white shirt sew-along.  It was difficult for me to sew with white, though.  I can't recall a single item that I've ever sewn with plain white fabric.  I wanted to paint it, or dye it or add some sort of embellishment.  I considered slot seams or piping to jazz it up, and finally found a white solution for my need to bedazzle: opalescent top-stitching thread.  It required a bit extra time to occasionally change the needle and thread, but it made me smile, and it adds some sparkle while remaining business-friendly.

Although I came to appreciate the whiteness of the shirt in the end, I still worried about one thing: pit stains.  Any white shirt I've owned has come to an early demise from sweat stains.  So I drafted a pair of dress shields in muslin.  Sure, you can buy them, but with the pattern still laying about, I drafted a pair to fit perfectly inside this shirt. The unbleached muslin is tan enough that it doesn't show under the slightly transparent white fabric. 
I may remove some length before serging the edges.
Tally-ho! I am back in the swing of sewing real clothes and I'm on to more basics for Stephanie.  She will need at least one more blouse and I've had a wrap dress pattern with her name on it for a year.  If I look busy enough, maybe no one will ask about t-shirt alterations.


Monday, August 17, 2015

I Heart Vogue 8793

The best part about being underemployed is being able to spend time with my kids, especially during summer break.  I am still amazed at how unproductive I can be!

My summer sewing projects have been sparse, to say the least.  Any sewing must be accomplished within 15 minute increments, which can be frustrating, but I keep reminding myself that being interrupted by a game of cards with my son or an impromptu discussion about global economic issues with my daughter is really a gift that I will soon miss.

I did manage to clear out some clutter, which came uncharacteristically easily to me after sorting through my dad's house in May.  The weeks of nightmares following that experience gave me plenty of motivation to clear out loads of my own belongings.  Marie Kondo's book was just the ticket to get me going.

Still room for more?

Her recommendation to never stack clothes in drawers is easy to manage.  I'm happy to say that my family readily followed my lead after seeing how lovely my closet looked.  I will admit that I have not yet touched my fabric or pattern stash, however.  It is on my list, but not a high priority.

Thanks to her eye-opening philosophy, I quickly realized that most woven tops do not "spark joy," and I am most comfortable wearing knits.

My thoughts exactly!

Having plenty of space and need for more knit tops, I ordered two knits from Sawyer Brook to play with Vogue 8793.  They are both rayon jersey, but very different hands.  The feel and drape of the navy and white Milly was my favorite, so I started with it.

I like the wrong side (left) as much as the right side (right)!

It is very soft, and very drapey.  Maybe too drapey for a t-shirt, but is quite comfortable to wear. I added an inch in length at the bust line and an armhole dart after seeing the wrinkles from the first V8793.  I really love wearing this top, and the lightweight nature of the fabric was perfect for the European heatwave that we endured on our vacation.  I have plans to take it in at the side seams about 1/2"-3/4", as the drapey is crossing over into dumpy.

As seen in Brussels, paired with red capris.  My son makes a point of making silly faces in most photos.

Even though I pack light, I brought plenty of clothes for our 17 days of travel.  Most of the tops I packed were too heavy for the unusually hot weather.  Luckily, we had plenty of laundry facilities along the way, so I could wear my new tops multiple times.
I think this was during the Sound of Music Tour outside Salzburg.
I guess my son likes his green shirt as much as I like my navy one.
Knit number two turned out to be perfect for V8793.  Also a viscose jersey with Elastane, it has about 15% stretch and is fairly lightweight.  Even with 3/4 sleeves, it was comfortable in the heat and the multitude of colors on a black background gives it versatility.
Love the colors in the "Electra" print!  
Also lengthened by 1" at the bust, this time I tried my hand at the French dart.  The busy print hides the dart well, and it shapes the top perfectly. I took several pictures of the dart, but it is really hard to see.  This was my first French dart, and I am now a devotee.  I will be using it frequently!


In Brugge with black jeans and pink cashmere.  We were so relieved to get some cooler weather!
And perfect for relaxing in Bruxelles after a sweaty trip from Brugge.  Miss that North Sea breeze already.

We had a wonderful, exhausting trip, averaging 6-8 miles of walking per day, which made the comfy clothes a necessity.  We started in London then flew to Munich to meet my daughter, who flew from Paris.  After working our way around Bavaria and Tirol by car -- with me at the wheel of a stick-shift -- we headed to Belgium and the Netherlands by train. My husband and I loved it so much that we checked real estate listings in many cities along the way!  

My daughter tells me she now has "reverse homesickness" for France, and I am starting to believe I feel the same way about the places we visited, as well.  My summer is wrapping up, with my daughter moving back to college this weekend and my son returning to school tomorrow.  I should have more time for sewing, but miss them already.

Monday, June 8, 2015

A Long Dry Patch Interrupted by Vogue 8793

I rarely make New Years resolutions, other than the "get back in shape" pledge necessary after an indulgent holiday season.  This year, I privately resolved to focus my sewing energy on improving my skills.  I resolved to only spend my valuable time in 2015 creating "couture" pieces with intricate hand sewing and custom fitting.  After finishing my daughter's orchestra dress, I thought quite highly of my sewing skills.  My hubris was punished quickly, with the sewing gods dropping the most annoying projects in my lap: zipper repairs, alterations, and other mindless mending.
My first sewing project of the year was replacing the zipper
in my step-father's "Squall" jacket from the 1980s.  
Early in the spring, I finally started a muslin of a sport coat that my husband had hinted about for some time.  After a couple of fittings, it still hangs on my dress form.  I lost interest after he came home from Hong Kong with a mini-wardrobe custom made for him in one day.
Yes, it has hung on that dress form for 3 months!
It's beginning to look very sad.

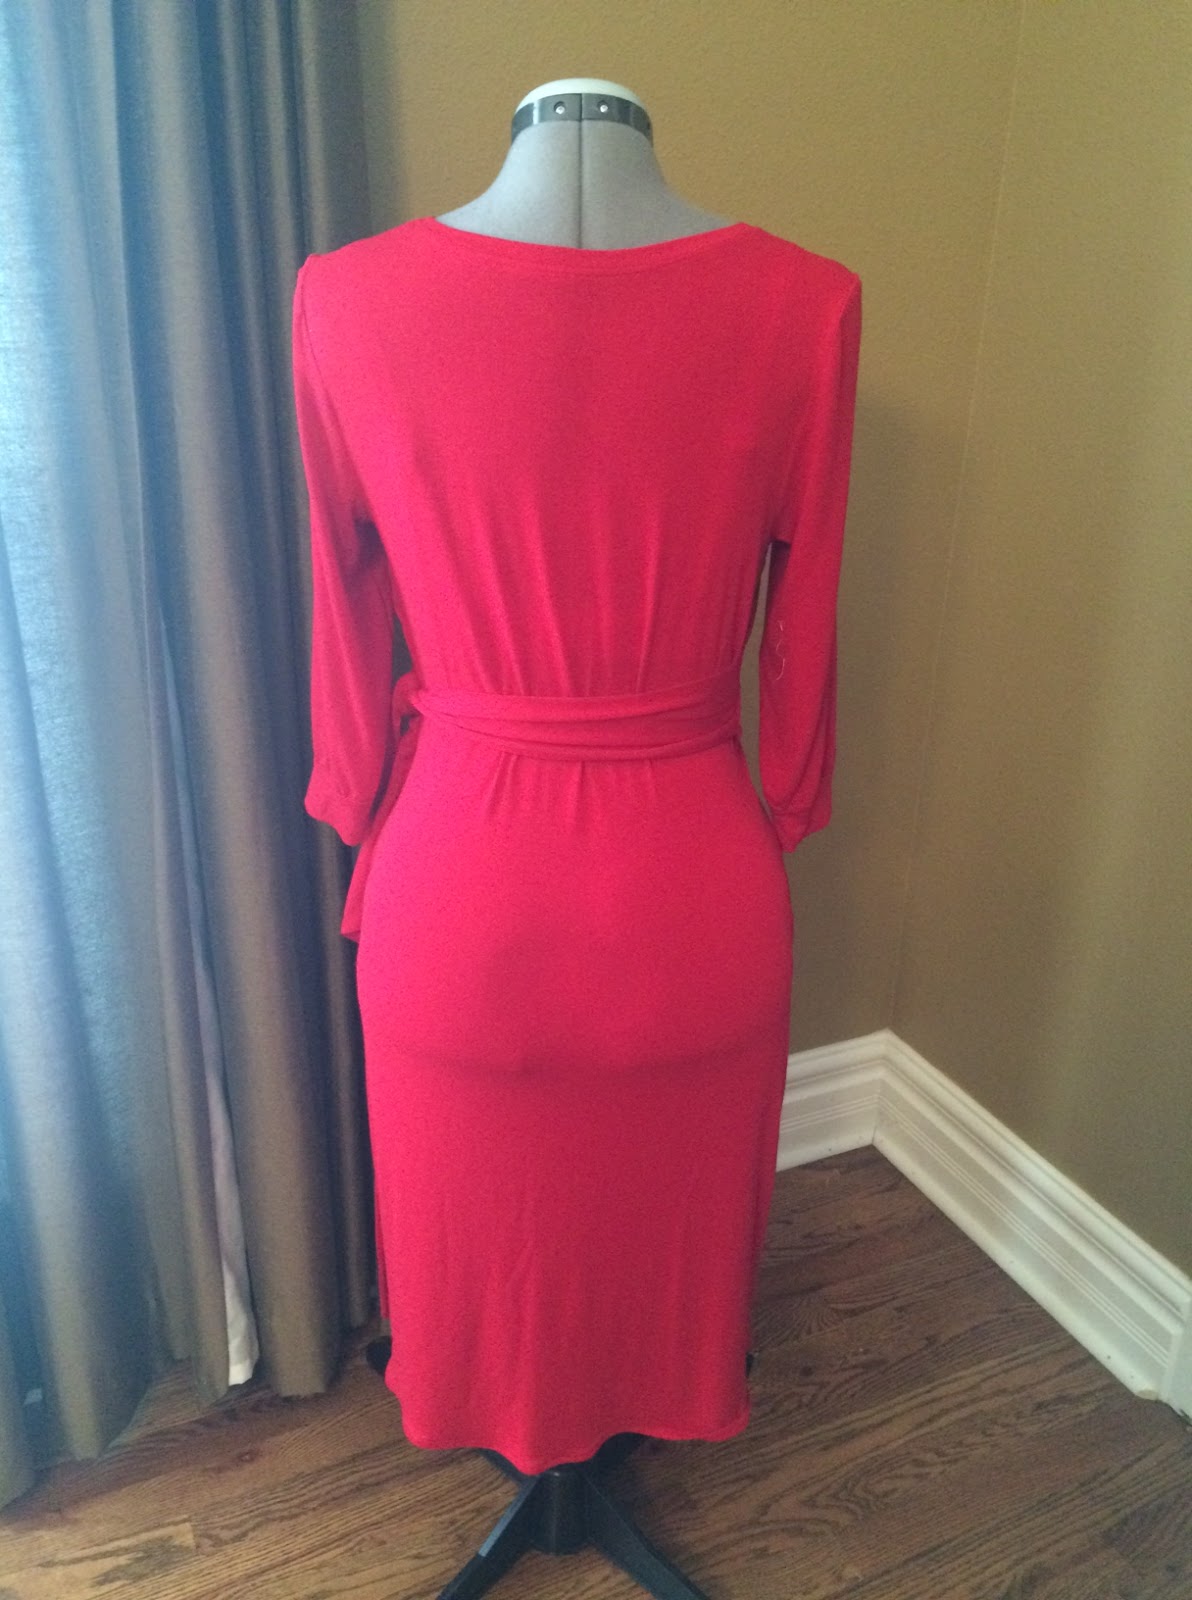
My own wardrobe requirements have become very casual, consisting of knit tops and yoga pants or jeans (I work from home).  Nothing to get me very excited about sewing for myself, especially since RTW fits me pretty well.  Why sew my own t-shirt?

Months ago I purchased the Tilton sisters' Craftsy class on "The Ultimate T-Shirt".  It was entertaining to watch the Tiltons sew a simple tee, but it took me quite a while to finally give it a go myself.

A nice piece of cotton interlock hanging in my sewing closet nudged me.  The color seemed a little "off" to me, and I spent several weeks thinking about surface design options that would make the color more pleasing.  Painting?  Overdying?  Stenciling?  Would the surface techniques work on a knit? Or will it look like a teenager's art project? After hours experimenting on the dusty purple/lilac/plum, I finally decided it was fine as-is and just sewed the shirt.

The tell tale signs of an amateur dyer.  At least the
defects were only visible at the selvages.
While cutting, I noticed  a strange color change at the selvage and realized that I must have dyed this fabric myself a few years ago.  I don't remember doing it, but I do remember buying white interlock and some fiber reactive dye as part of an aborted SWAP.  Hmm.   Shh!

I like the end product, though I should have fitted it better.  It didn't appear to need a dart before I put the sleeves in, but after the sleeves were in, it seems to need a bust dart!  I didn't put the funky neckband in my shirt per the pattern, rather I followed the flat neckband in the Craftsy class.  It's a great scoop neckline, and I can see making this shirt again (with a little more room in the bust and a dart).

The pattern seems to run big (I feel that way about most of the Big 4 patterns).  I cut a size small, even though I measured larger (I don't recall how much larger).  The small is perfect for my shoulders and waist, but more room in the bust wouldn't hurt.
An "action shot" of me walking.  I thought my son
was finished shooting, but this was actually the only
decent shot.

It came together quickly, and I can see myself making a few more of these.  I may or may not do the funky neckline, or mix colors and patterns as the Tiltons do.  I love their style, I am just not sure that it's my style.  I'd like for it to be my style, but I am shy about pattern mixing.

As for the Craftsy class, it was entertaining, but I honestly didn't learn anything new.  It is well-suited for a beginner.  I do believe that I am addicted to Craftsy.  I pledged not to buy anymore classes, and made it a few months before breaking down and buying one of Suzy Furrer's pattern making classes.

Apart from alterations and mending, this has been my only sewing project since the fleece jacket.  Life and death have gotten in the way this spring.  Sadly, my dad died in April, yet there has been little time for grieving, with all the work required to wrap up his estate and affairs.  We spent an exhausting week clearing out his house, which had previously been my grandparents' home.  It was a week in the Twilight Zone for me, finding things that belonged to my great-grandparents, as well: pictures, report cards from 1908, utility bills from 1945 and one treasure -- Spadea patterns still in the mailing envelope from 1961.
My daughter knew I would be excited to open this envelope, untouched
 and hiding in the dining room buffet since 1961.

Spadea "Dinah Shore" patterns, the sixth is a large lace collar.
Apparently Dinah Shore patterns were very popular.

We filled a large dumpster after donating all the furniture and working appliances to a domestic violence shelter and begging relatives to take some of the "keepsakes" home.  Like me, most of my cousins are in a minimalist frame of mind.  We did encounter several dumpster divers who were happy to cull through the cast-offs in search of treasure.
The three amigos, REALLY happy to be finished.  It's hard to see just how big that dumpster was.

The experience of hauling off refrigerators that haven't worked in 15 years and monogrammed bowling balls belonging to someone who died in 1969 has spurred me to think about downsizing my own junk.  I don't want my heirs to dispose of closets, cabinets and cartons full of fabric.  I own very few patterns that anyone would be excited to find in 2060.