Friday, June 21, 2013

Creative Block

I'm at a creative standstill...I have yards of fabric, many, many patterns, but no drive to dive into a new project.   Nothing sounds interesting enough to me to make it worth my effort.

My daughter is away for most of the summer, attending a program three hours from home, so we don't even see her on weekends.  Although it is nice to have a relatively clean home, I do miss her company.  If she were here, I wouldn't be "blocked" on what project to start next.  She would suggest something (for herself, of course).

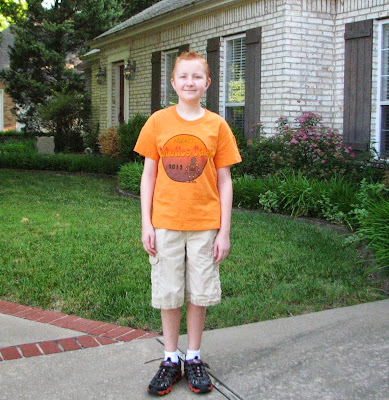
It's not that I don't have any projects on my "list".  I have several potential projects, including most of my SWAP items.  I am just missing the motivation to start one of them.  So I was a bit excited when I picked up my son's t-shirt for his robotics camp.  They handed me an adult medium --that looks like a large -- and he's not even a small.   

Sam: "It's like a dress.  Look!"  (Frowning.)
Grandma: "Just wash it and dry it on a hot cycle several times, and it will be fine."
Mom: "It's pre-shrunk, and it wouldn't shrink that much.  I can fix it, trust me." (Rubbing my hands together.)
Sam (with a doubtful look on his face): "Okay, fine."

Did I say I was excited?  About a cheap t-shirt? It was an opportunity to sew with a cotton jersey knit that I didn't buy, and he probably won't wear it again anyway.  Add to that -- I got to sew for my son.

It was a snap. I did it the easy way, though, by just using a jersey shirt that does fit him as a template.  Although I briefly considered deconstructing the sleeves, cutting it all down and putting it back together again.


The "jersey" stitch on my 930 worked out great for the hems -- it's not a cover stitch -- but fine for a kid's camp shirt.  The hems have even survived a couple of rounds in the washer/dryer without flipping up like they usually do on t-shirts (as in the original, above).  The "vari-overlock" stitch worked well for the seams.  And that was it -- he wore it comfortably to camp.


Sunday, June 16, 2013

A New Gizmo

I love my sewing machine.  My grandmother gave it to me several years ago, after realizing that she just couldn't sew anymore. It may be my most treasured material possession.

It's a Bernina 930 -- a workhorse that I've used to sew clothing, draperies, quilts, upholstery and even a very heavy fabric awning.  It sews a multitude of stitches, many of which I have never even tried.  However, it doesn't make great buttonholes.  It makes decent 5-step buttonholes, but 9 times out of 10, I choose to hand-work a buttonhole or make a bound buttonhole.

Several times I have considered purchasing a newer computerized machine with all the fancy options, but I was mostly happy with my 930, and just couldn't justify buying a newer machine.  Then I realized that with my short shank presser foot adapter, I could use this with my 930:
Greist Vintage Buttonholer, style #1
It was patiently waiting for me on ebay for the low price of $18, which included shipping.  This model is from 1956, and it arrived in perfect shape.  It makes nice buttonholes with five little templates and even comes with a keyhole version.  I used it for the buttonholes on the waistband of my red pants.  It was fun to watch, simple to use and they came out very nicely.

The width of the stitch is adjustable and the stitching will appear thicker by running it around more than one time.  Here is the 1 1/8" keyhole buttonhole in contrasting thread:


I'm still figuring out the nuances of lining up the fabric and stitch width, but it's super fun, and I'm very pleased with my purchase. I'm a little worried that I may never hand-work a buttonhole again!

Friday, June 14, 2013

Spring Cleaning

My husband has been politely reminding me to get my sewing room cleaned up for quite some time.  Why does he care what my sewing room looks like, you ask?  Well, because my sewing room is actually our dining room!  It is really a nice place to work: it has great natural light, it's near the kitchen, and the table quickly expands to 96".  Unfortunately, I also tend to pile my fabric and patterns and tools on it, too.  So I agree, it can be quite messy.

Several years ago, we realized that we rarely used the dining room and my husband had the idea to convert it to a "craft" space for the kids and me.  A few friends (including real estate agents) warned us not to do it, but we had no intentions of selling in the near future.  We added some built-in cabinetry to house the supplies, as well as a pop-up mechanism for my sewing machine, so we can quickly hide it when we do use the room for dining.  In theory, it would work as both a formal entertaining space and a sewing studio.

In practice, I have taken over the entire space with my various projects and the cabinets are over-flowing with fabrics and patterns and notions, and things are rarely put out-of-sight.  Sometimes, I start a second (or fifth) project before cleaning up the previous project(s).  I'm just not very organized.

Fabric waiting to be sorted
So I began by pulling out the contents of the cabinets, piling it on the table and started sorting through it. In order to get a better idea of what I was storing, I measured the fabric and cataloged everything.  Even after throwing out the smaller, unusable pieces, I have over 80 fabrics in my stash!  Most of the fabric is left-over from previous projects, but 35 pieces are at least a yard in length, and 20 pieces are completely unused.  Before my clean-up, I had no idea that I had a hoarding problem.  Okay, I knew I had a hoarding problem, now I recognize the extent of it.  I have sworn off purchasing any more fabric until I've worked through some of the stockpile.

Fabric Catalog (in Excel)
The cataloging slowed the process a bit, but after seeing how much fabric can be stuffed into the cabinets, I wanted to have the inventory information at my fingertips, mainly so I can avoid any future impulse to run out and buy more fabric (at least until I've worked through most of this).  It's a simple Excel spreadsheet, making it easy to filter by color, content, size, etc., so in theory, it should be quite useful for me to find a fabric quickly.  We shall see.

I now have a lot more space for storage and I know where everything resides (or is supposed to reside).  I even set myself up with a little system where I have a fabric storage bin to hold everything I need for the current project (assuming there is only one), and it's easily stored during any hiatus in sewing or for entertaining dinner guests.  It sounds good, in theory.


Friday, June 7, 2013

Love my red jeans!

My red jeans were a ton of fun.  I initially thought that all that red would be too wild for pants, but after toying with the idea of sewing pedal pushers or shorts instead, I decided to sew them long anyway, if for nothing else but to experiment with the pattern.  I also comforted myself with the fact that I do live in Razorback Country, so red pants are probably always socially acceptable here.


As a reminder, I "cloned" a very comfortable pair of RTW pants.  The RTW aren't jeans, they're  Jones New York dress slacks in a slightly stretchy RPL that looks like wool. I love them so much, I'm afraid I will wear them out, so I want to make a few extra pairs for myself.  I was a little concerned about how denim would fare with this pattern -- even if it is stretch denim -- but it's been fine.
Draft of pants front pattern - pockets added.
My dress pants do not have pockets, which I find rather annoying, so I added them to my pattern.  Because pockets that pop out can also be annoying, I utilized the pocket stay method, where the pocket runs from the outside seam to the fly.  In order to help contain the stretch along the bias (thus utilizing my pocket stays as a built-in girdle), I stitched two semi-circles that roughly follow the bias of the inside pocket piece.  That's in addition to cutting them so the lengthwise grain runs crosswise, which reduces the capacity to stretch a bit more.  Next time I should probably just use power net!
Pocket with bias-controlling stitches (in red)

I picked up some really fun, multi-color paisley quilter's cotton in coordinating shades to use for pockets, waistband facing, bias tape and bias hem facing (since they weren't quite long enough for even a 1/2" hem).  The coordinating cotton is what has made this project so enjoyable.  I'm not normally a paisley fan, but it really works with this crazy denim.  The red center of the "amoeba" matches my red perfectly.  I found as many uses as possible for the paisley.


Pocket applique'
I finished them Saturday morning and wore them the rest of the day to run errands.  The only thing I would change is to reduce the ease a bit, since the denim has a tiny bit of stretch.  They are really comfy and I am surprisingly not self-conscious about gallivanting around in bright coral-red pants.  The pattern is a keeper, too.